Things you will need:
- Rubber gloves.
- Plastic sheets to protect your surfaces/the floor under where you are working.
- Two deep plastic bowls or buckets. Old ice cream containers will work just fine.
- A spreading tool. An old plastic loyalty card is ideal or you can buy spreading tools at any hardware shop.
- Two good, thick sponges.
- Grout.
- A spoon or implement of some sort to mix the grout.
- A bottle/jug of water. I also find it handy to have one of those water spritz bottles which are used for spraying plants so that you can fine tune the amount of water you add.
- Stiff plastic, scrubbing brush for cleaning.
Method:
1. Put your gloves on and make the grout. In a container , add the grout powder. Add the water in dips and daps and keep mixing until you get the right consistency – you are aiming for a paste: not runny, not with water sitting on the top, and not too firm. I read once that the best consistency is that of a cow pat and I regret to say that that is the analogy I always use.

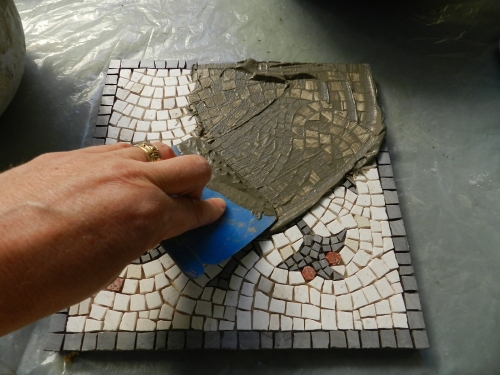
2. With a sinking heart (it’s never easy), put a big dollop of this horrid, dark, goopy stuff on the front of your beautiful mosaic and use the spreading tool to push the grout into the gaps.

3. Cover the whole mosaic with the grout and don’t forget the edges:

4. Use your fingers to push the grout into all the gaps. You will find little air bubbles appearing as you apply the grout, so keep going until all the holes are filled.

5. Now use the spreader to remove the excess grout.

6. Fill your second plastic tub with clean water. Soak both of the sponges and squeeze out every last drop so the sponge is damp but not wet.
7. Wipe the front of the mosaic with the sponge – once – and then turn the sponge and using a clean side, wipe the mosaic again. It’s vital to always use a clean side of the sponge as otherwise you are just smearing grout residue over the cleaned parts of your work.

8. Keep going with both sponges, frequently rinsing them out and using fresh water until the front of the mosaic is clean. It will still look slightly on the grungy side, but don’t worry, that will come off in the final clean.

9. Leave to dry for a good, long while. There is no rush so better to leave it for more time rather than less. Once it’s thoroughly dry, get a stiff plastic brush, clean water, and give it a good, energetic wash.

10. Put four, little, felt self-adhesive patches on the back of the mosaic so it can be put on a polished wood surface without scratching it.

Drum roll….Der, der! You’re done. Congratulations.