 Dala Picture Perfect is a TRANSFER CREAM that allows you to transfer any copy of a photo, gift-wrap or print onto fabric. It will enable you to decorate clothing, cushions, bedding or anything made from fabric with your favorite snapshots. Dala Picture Perfect is a TRANSFER CREAM that allows you to transfer any copy of a photo, gift-wrap or print onto fabric. It will enable you to decorate clothing, cushions, bedding or anything made from fabric with your favorite snapshots.
This new product is not only ideal to use for fabric scrap-booking projects, but also to create special gift and home décor items.
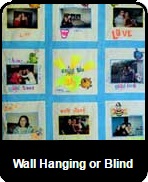
Our project for this issue is a FRIENDSHIP WALL HANGING and can also be used as a blind or throw. The idea is that of a weekend reunion of old high school friends. They will each bring a photocopy of a photo and will spend time fusing the copy onto a piece of fabric and write a message with DALA NEW LINERS. The messages on the hanging have been taken from the idea of writing a message on a school shirt in the end of the metric year.
YOU WILL NEED:
EQUIPMENT:
- Fabric, cut, washed and ironed, 32cm squares each
- A piece of fabric to paint for frame strips
- Fabric for lining
- Brush
- Bucket of water
- Paper towels
- Roller
- Plastic to work on
- Good quality photos and gift wrap that matches the theme
- Copper hanging accessories
- Batting optional
 METHOD: METHOD:
- Enlarge, lighten and copy photos as needed for the project on no thicker than 80gm paper. Cut off excess white borders. Cut out figures on wrap paper roughly and glue to white paper and make a copy. Cut pictures out fine and keep ready to decorate around the photos.
- Plan your hanging and mark with a pencil where its picture should be fused. Paint a generous layer of Picture Perfect onto the print side of the picture. (Not too thin, but also not too thick.) TIP: It will help to make a test with 3 copies on separate cloths. One painted thin, one medium thickness and one thicker. Follow the next steps and decide which one works the best for you.
- Wait for about 5 minutes for the cream to penetrate the ink on the photo, but do not let the PP dry. Place print side down onto fabric on the pencil mark. Place a piece of plastic onto the picture and roll gently with a firm roller over picture. The plastic will prevent the paper from sticking to the roller and damaging it. Make sure that there are no air bubbles that lift the print from the fabric. Also make sure that the edges stick properly to fabric.
- Turn the cloth around with the paper at the bottom and place on to plastic. Paint another layer of Picture Perfect at the back onto the material to adhere the print properly. Leave overnight, preferably 24 hours to dry.
- Turn cloth over. Place 2 or 3 sheets of paper towel on the picture and spray soak it wet. Do not soak the cloth in water. The whole picture will come off. Soak for at least 30 minutes.
- Gently move the ball of fingertips over the paper and remove the first layer of paper. It will come off in very small pieces. Do not try to remove all the paper at once. Let stand for approximately 10 minutes, then repeat the process twice by first dipping fingers in water, dampen the paper and remove even smaller particles of paper, until the picture is clear.
- When paper is dry it will look as if still fine flakes remain. That will disappear when another layer of PICTURE PERFECT is painted over the picture.
- Let dry and paint a second layer of PP if paper particles remained.
- If any spot on the picture has been damaged, you may repair it by simply painting it with a small round brush and matching fabric paint.
- Paint in figures and outline frames with the NEON PAINTS and outline frames to make edges neat if necessary. Write details with the FINE LINERS.
- Iron on the reverse side with “ironing cloth” on top of your work at maximum temperature that the fabric can bear.
- Paint enough material to use for strips to stitch the blocks together with. The strips serve as frames for the blocks. Iron or bake according to instructions on the container. Cut and stitch the hanging together with face sides together. Turn over and press. Hang with copper hanging accessories.
|

 Dala Picture Perfect is a TRANSFER CREAM that allows you to transfer any copy of a photo, gift-wrap or print onto fabric. It will enable you to decorate clothing, cushions, bedding or anything made from fabric with your favorite snapshots.
 METHOD: