You will need:
Zelcraft Podge or Kraftex Decopodge
Zelcraft Paint: Yellow, Orange, Red, Green, White
Creative Cracks
Dala Deco Varnish (Heat Resistant)
Serviette and large coaster
Applique paper
Stencil brush
Large brush
Large Varnish brush
Sponge sander
Cardboard and masking tape
‘Lazy Susan’ (optional)
Iron
Small scissors, palette-knife and palette
‘Prestic’ Glue
| Note: The specific references to stencil and varnish brushes, merely implies that you require different brushes for specific functions – you should also mark them as such. Wash brushes with a drop of dishwashing liquid under running water. |
- Preparing the round disc / coaster:
- Sand smooth
- Seal with 2 layers of Podge
- Sand smooth with sponge sander
- Seal with another layer of Podge
- Paint
- Stick the disc onto the Lazy Susan with Prestic, ensuring that it is well centered.
- Scoop yellow paint, as if with a spoon into the center of the disc and spread from the center outwards, while turning the plate.
- Dry well and apply at least 2 more layers, or until the disc is well covered.
- Sand lightly until smooth.
For a dappled effect:
- Hold a pencil 4,5 cm from the side, supporting it with your little finger. Turn the plate, making a perfect circle.
- Stipple on Coral paint where you want it to stay yellow (outside the circle and on the edges of the plate). Then stipple with orange until it blends into the yellow.
- Dry well.
Crazy Cracks
- Apply Creative Cracks liberally with a large varnish brush. Dry well.
- Mix a little bit of green Craft Paint with red, creating a warm burgundy.
- Apply on top of the Creative Cracks.
| Tip: Use a large flat brush. Apply the paint liberally with the brush at a 45º angle, making sure to never paint the same area twice. Never move the brush in backwards and forwards strokes. |
- The red paint will now crack, showing the yellow paint underneath.
- Remember: Metallic Craft Paint can only be used as a bottom layer for cracks, e.g. bronze with a caramel top layer.
| Tip: The texture/finish of Creative Cracks is natural, not fine and smooth. Therefor I do not sand Creative Cracks. For the same reason I chose the texture of natural wood in stead of Supawood. Experiment with your own preferences. |
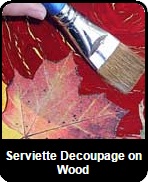
- Serviette
- Tear off the 2 layers on the back of the serviette.
- Iron, with a dry, warm iron onto the rough side of the applique paper with the picture side facing up.
- Stick serviette with masking tape, onto the cardboard.
- Seal with Podge and allow to dry well.
- Now pull the applique paper off the back of the serviette.
- Stick the serviette, upside down, onto the cardboard and seal again with Podge.
| Tip: If you want the serviette picture to be nice and clear, you can now paint the back of the serviette with White Craft Paint, applying the paint evenly with a sponge roller. The Podge on the back and front of the serviette will prevent the paint from penetrating the picture. |
- If you want the cracks to be see-though, leave out the Podge sealing and white paint process.
- Remove masking tape by cutting it and not tearing it off,
- Cut out the designs and compose them on the disc. Stick them down with Prestic.
- Lift each design up and paint Podge onto the back.
- Then stick it down with your finger, pressing from the centre of the design outwards.
- Place cloth (moistened with a half and half water and vinegar solution) on top and roll out all the air bubbles.
- Hold up against the light to check for more bubbles and press those flat with a palette knife. Dry well.
- Sealing:
- Seal with Podge, press out all air bubbles with palette knife and leave to dry well.
- Paint on 2 layers of Deco Varnish Heat Resist with a large, flat varnish brush, while turning the disc.
- Leave for 48 Hours or longer so that varnish can harden before hot items are placed on it.
| The paint, varnish and Creative Cracks are applied while the disc is turned. This will result in a spiral shape. Experiment with painting strokes at right angles, thereby altering the pattern of cracks. |
|